Devon Guild Summer Show

The Summer Show, the annual exhibition of work by the Devon Guild of Craftsmen membership is on at their Bovey Tracey gallery until 4th September 2016.

This year’s show has no specific theme and features a particularly wide range of exciting work. Wai-Yuk is represented by her “Taunton Kimono”.

Devon Guild Summer Show

Private View

The Summer Show Private View

If you have the chance to be in South Devon over the next month, try to get along to see a very fine selection of the best in contemporary craft.

The Devon Guild of Craftsmen, Riverside Mill, Bovey Tracey, Devon TQ13 9AF
Open seven days a week – 10.00am to 5.30pm.

Metal sculpture in Florence

A few weeks ago I posted some photos of Florentine wrought ironwork. Here is a follow-up featuring Florentine metalwork closer to the fine art end of the spectrum. This is a huge subject with a great tradition but these are just a few pictures that appealed to me.

sculpture 2

The main bronze doors of Florence Cathedral by Augusto Passaglia

The casting of relief-decorated bronze doors has been a major art form in Florence since the start of the Renaissance. In fact, many classic texts date the true start of the Italian Renaissance to the sculpting of Lorenzo Ghiberti’s doors for Florence’s Baptistery.

sculpture 1

“The Annunciation” – A panel in a side door of Florence Cathedral

Sadly, the two sets of doors that Ghiberti made for the Baptistery have now been replaced by modern copies in order to preserve the originals. The copies are superb, however, and a great testament to an enduring Florentine bronze casting tradition.

sculpture 6

One of the North doors of the Baptistery (a modern exact replica)

sculpture 3

The second set of doors by Ghiberti were christened “The Gates of Paradise” by Michelangelo

sculpture 4

Detail from “The Gates of Paradise” (a modern replica)

Cast sculpture can be found throughout Florence both in the galleries and out in public spaces. A favourite of mine is the fountains in the Piazza della Santissima Annunziata by Pietro Tacca.

sculpture 7

Detail from a mannerist fountain by Pietro Tacca

As well as skills with bronze, Florence has long been renowned as a centre for gold-smithing. In the Pitti Palace fine examples are displayed of gold working from many periods.

sculpture 10

A gold mounted drinking horn

sculpture 11

A large gold snail featuring a real seashell

Finally, though not high art, I noticed a number small metal tortoises scattered around the city, often in hard to spot places and usually carrying heavy loads on their backs.sculpture 8

sculpture 9

See also: Florentine Ironwork


Major Ikat Exhibition

A major exhibition of IKAT textiles has just opened at the Brunei Gallery, in the School of Oriental and African Studies, University of London. Organized by the World Crafts Council, this marvellous show is well worth a visit by anyone with an interest in traditional textiles.

Ikat is a technique where yarn is dyed with multiple colours prior to weaving so that patterns arise from aligning the yarn colours during the weaving process. Yarn is most commonly dyed using a tie-dye or similar resist technique. Because the production techniques are both painstaking and time consuming, Ikat textiles are among the most expensive of all fabrics. Variations on the Ikat technique can be found all around the world.

Ikat 1

The Brunei Gallery is a beautiful venue and deserves to be much better known. It is only a 3 minute walk from the British Museum. In addition to a program of changing exhibitions, there is a permanent collection and a beautiful Japanese roof garden.Ikat 5The show features examples from some ten countries in the Asia-Pacific region, plus items from Latin-America, the Middle East, West Africa and Europe.

Ikat 3

As well as the textile displays, on specific event days there are live demonstrations, a symposium and film screenings.

Ikat 4

The gallery is open Tuesday to Saturday, 10.30 to 17.00. Closed Sundays, Mondays and Bank holidays. Admission is free.

Ikat 2

Ikat 6

For more details, see the Brunei Gallery website

Ironwork in Florence

When the family took a short break in Florence a couple of weeks ago we were all struck by the amount of wrought ironwork attached to walls and covering ground floor windows. Much of this ironwork dates back to renaissance times but the tradition of using metal in attractive and interesting ways continues today.

Iron 18

Wrought iron bars covering the ground floor window of an old building

In medieval and renaissance times Florence was a turbulent place, with civil unrest, invasion and religious upheaval all being regular hazards. Measures to keep unwanted intruders out of your property were essential.

Iron 7

Over time the window coverings became less utilitarian and more decorative


Iron 8

Wandering the streets of Florence you see many variations of the blacksmith’s art

Iron 14

Iron 9

A more modern take on the window bars concept

During the renaissance, streets and buildings were lit by burning torches inserted into brackets on walls. Different designs of bracket can be seen throughout the old city.

Iron 2

Bracket for a torch

Iron 5

Later these torch brackets also became much more elaborate like this dragon

Iron 4

An elaborate lantern

Iron 13

The metalwork tradition continued when new kinds of street lighting were introduced

Iron 17

Many interesting balconies continue the public metalwork tradition

The Taunton Kimono -part 2

This is the second post covering the making of a silk dyed Kimono for the “Imprints” exhibition at the Museum of Somerset in Taunton.

Detail of the finished Kimono showing the Shibori textures

Detail of the finished Kimono showing the Shibori textures

Stage two of painting the silk involved adding detail and richer colours to the design.

Fossil ammonites were used as motifs to add detail

Fossil ammonites were used as motifs to add detail

While the Rhinoceros teeth were my main inspiration, many other items in the museum fossil hall were used as inspiration for decorative details. These included ammonites, crinoids (also called sea lilies), gryphaea (devil’s toenails) and the ribs of an ichthyosaur. Some fossil cabinets had photographs of coral as a background, and these too found a place in the decorative scheme. Even the colour scheme of the Kimono was originally inspired by a picture of a red desert scene on the end wall of a display.

Fossil Crinoids or

Fossil Crinoids or “sea lilies” were another source. The dye didn’t work as planned, and so some of the fine detail was lost

The long white bars were inspired by a cluster of fossil ichthyosaur ribs

The long white bars were inspired by a cluster of fossil ichthyosaur ribs

At this point the front of the Kimono was lagging behind the back view

At this point the front of the Kimono was lagging behind the back view

Here the garment is pinned up prior to the second steaming

Here the garment is pinned up prior to the second steaming

Some of the detail and colour intensity was lost in the second steaming process. This was partly due to my unfamiliarity with the dyes, but mostly due to fact that the silk was just too lightweight to take intense dye easily. If I make another Kimono like this I will certainly use a much heavier silk.

Adding stitches for Shibori knotting

Adding stitches for Shibori knotting to create texture (click to enlarge)

Texture was added to the silk using Shibori knotting techniques. First the areas to be textured were stitched

Stitching a different pattern

Each thread was then pulled tight and knotted before the fabric was steamed again to set the creases

Each thread was then pulled tight and knotted before the fabric was steamed again to set the creases

Fully knotted silk ready for steaming

Fully knotted silk ready for steaming

After the final steaming to fix the texture, all the Shibori threads had to be carefully removed before the Kimono could finally be assembled.

Assembling the garment. The main body panels were nearly 4 metres long and everything was hand stitched

Assembling the garment. The main body panels were nearly 4 metres long and everything was hand stitched

Preparing the silk lining material

Preparing the silk lining material

The Taunton Kimono

The Taunton Kimono

The “Imprints” exhibition is on at the Museum of Somerset, Taunton Castle, Castle Green, Taunton, from 10th October 2015 to 2nd January 2016.
The museum is open Tuesday to Saturday 10.00am to 5.00pm

The Taunton Kimono -part 1

The Taunton Kimono – part 1

A couple of years ago The South West Textile Group arranged a future exhibition at the Museum of Somerset in Taunton. The long time scale and the chance to exhibit in a beautiful space made me decide to take on a major piece of work. I have long wanted to tackle making a Kimono and this seemed the perfect opportunity. The project proved to be a long and steep learning curve, but on October 9th I got to see my piece (now known simply as “The Taunton Kimono”) on display at the private view of the “Imprints” exhibition.

My Kimono on display at the entrance to the

My Kimono on display at the entrance to the “Imprints” exhibition at the Museum of Somerset

All the work in the exhibition was to be inspired by items or displays in the Museum of Somerset permanent collection, so a day trip to the Museum was the starting point for everyone. A tour around the collection begins with the fossil gallery. It was here that I found the objects upon which I wanted to base my design. One was a 55,000 year old fossil Woolly Rhinoceros skull which featured the most amazing teeth. The serpentine graphic shapes of these teeth just begged to be reused in a piece of art, and the fact that the skull had been dug up just a few hundred meters from the museum seemed to make it even more appropriate.

The 55,000 year old woolly rhinoceros skull at the Museum of Somerset

The 55,000 year old woolly rhinoceros skull at the Museum of Somerset

Design work began with sketches based on photographs taken at the museum. (In the end I almost filled a couple of sketchbooks with ideas big and small.) These led on to a large number of watercolour sketches where I began to get an idea of the colour scheme I wanted to explore.

Watercolour sketch exploring ideas for the Kimono design.

Watercolour sketch exploring ideas for the Kimono design.

Preparatory watercolour sketch

Preparatory watercolour sketch

Work on the Kimono itself started with a full-sized line drawing that was then transferred on to the silk.

The final design was drawn out full size on pattern paper

The final design was drawn out full size on pattern paper

Transferring the design to the silk using a fugitive ink pen

Transferring the design to the silk using a fugitive ink pen

I had originally planned to use exclusively Shibori techniques to decorate the fabric, but the silk I had was too lightweight and too prone to bleed along the satin fibres to be reliably dyed using these methods. I therefore resorted to conventional silk-painting techniques and used Shibori purely for texturing.

The silk was pinned to purpose made frames and the design was divided up using water-based gutta resist

The silk was pinned to purpose made frames and the design was divided up using water-based gutta resist

Using a hairdryer to selectively dry the dye allowed the creation of tonal variation

Using a hairdryer to selectively dry the dye allowed the creation of tonal variation

The two halves of the Kimono were developed together to ensure a good match

The two halves of the Kimono were developed together to ensure a good match

My husband Alex was heavily involved in the project throughout. As well as helping with both the design and execution, he also made the painting frames with rollers on each end to cope with the long fabric lengths. His other great contribution was in making a really good steamer to fix the colours. He simply fixed an aluminium tube to the top of a large saucepan, with a hollow tube suspended down the centre around which the silk was rolled.

The silk was steam fixed in a steamer made by my husband Alex

The silk was steam fixed in a steamer made by my husband Alex

After the first round of painting and steaming, the pieces were pinned together to see the effect

After the first round of painting and steaming, the pieces were pinned together to see the effect

The “Imprints” exhibition is on at the Museum of Somerset, Taunton Castle, Castle Green, Taunton, from 10th October 2015 to 2nd January 2016.
The museum is open Tuesday to Saturday 10.00am to 5.00pm

My next post will cover the remaining part of the Kimono making process.

The Taunton Kimono – part 2

The Arimatsu Shibori Museum

During the Edo era in Japan, the Tokaido road leading from Kyoto and Osaka to the capital Edo was the nation’s main highway. Near the city of Nagoya a village called Arimatsu grew astride the Tokaido and achieved great prosperity through the production of indigo dyed clothing fabrics that were sold to travelers on the highway. These fabrics were decorated using sophisticated Shibori tie-dyeing processes. Shibori techniques already had a long history in Japan but in Arimatsu many processes were developed and refined that allowed the large-scale production of many complex patterns.

A historic textile warehouse on the little street that was once the great Tokaido

A historic textile warehouse on the little street that was once the great Tokaido

Alex and I visited Arimatsu in 2014. The village has long been absorbed within Nagoya’s suburbs and what was once the great Tokaido is now just a sleepy side street lined with many nice old buildings. Several of the buildings are the great warehouses and mansions of the textile merchants who made their fortunes here, alongside old-fashioned restaurants and craft shops selling shibori items. There is also the Arimatsu Shibori Museum, which was the reason for our visit.

Arimatsu Shibori dyed fabrics on sale in a craft shop

Arimatsu Shibori dyed fabrics on sale in a craft shop

The key to Arimatsu’s success lay in systematising and regimenting the production of small and complex repeat patterns. One important technique was the printing of a guide pattern on the fabric using a fugitive ink. This allowed the craftperson to align many hundreds of small individual elements with great accuracy. Various posts and hooks were also developed to help the worker carry out the arduous task of repeating complex patterns.

A craftswoman tyeing Shibori knots using dots printed in fugitive ink as a guide

A craftswoman tieing Shibori knots using dots printed in fugitive ink as a guide

At the Arimatsu Shibori Museum one can watch craftswomen demonstrate some of their techniques, though when they are working at full speed it is almost impossible to see what they are doing. It is only when they slow down a great deal that one can work out how the seemingly magical knotting techniques are achieved. The ladies we watched were very patient and spent a lot of time showing us exactly what they were doing step by step.

Craftswomen demonstrating at the Arimatsu Shibori Museum

Craftswomen demonstrating at the Arimatsu Shibori Museum

This woman is using a hook tied to a post to help control the complex knotting process

This woman is using a hook tied to a post to help control the complex knotting process

A section of knotted fabric. When the entire bolt of cloth is completed it will be sent for dyeing

A section of knotted fabric. When the entire bolt of cloth is completed it will be sent for dyeing

Pieces of knotted fabric. The completed material beneath shows the final pattern

Pieces of knotted fabric. The completed material beneath shows the final pattern

The Museum features a wonderful display of example pieces that show each traditional pattern from untied material through the tied stage, the dyed stage and on to the finished patterned fabric.

Examples of just a few of the many classic Arimatsu Shibori patterns

Examples of just a few of the many classic Arimatsu Shibori patterns

Each sample shows every stage from blank white cloth through to finished pattern

Each sample shows every stage from blank white cloth through to finished pattern

A close up showing the different stages

A close up showing the different stages in producing one design

There is also a display area showing Kimono and other items created from Arimatsu Shibori fabric.

Gallery display showing Kimono with Shibori designs

Gallery display showing Kimono with Shibori designs

A famous Kimono with Hokusai's "Great Wave"

A famous Kimono with Hokusai’s “Great Wave”

A contemporary Shibori wall hanging

A contemporary Shibori wall hanging

The museum features a large shop with a wide range of locally produced textile goods ranging from small “touristy” items up to very fine goods such as Kimono at truly eye-watering prices. Sadly, even with the local craftspeople’s great speed and skill, such labour intensive items now struggle to find a market at a viable price. Much of what looks like Shibori fabric sold in Japan today is in fact printed and we discovered that much of the genuine Shibori made for the more commercial end of the market is now sent from Arimatsu to Korea and China where it can be knotted by much cheaper labour.

Japan 5 – Hida no Sato

Hida no Sato (Hida Folk Village) is a wonderful open air museum situated on the outskirts of Takayama, a delightful town in the mountains of central Honshu, north of Nagoya. The site consists of around 30 old buildings from all over the mountains that were dismantled and then rebuilt here in the 1970’s. The buildings are mainly large farmhouses of various types and most are over 100 years old.

The old buildings have been re-erected as a small village in a rural landscape

The old buildings have been re-erected as a small village in a rural landscape

The Hida region of Gifu Prefecture is subject to heavy snowfall (often up to two metres) and the different styles of architecture show alternative approaches to dealing with this climate. In the north of the region the farmers built using steeply sloped roofs so that snow would slide off. This is the “gassho-zukuri” (praying hands) style of building used at the nearby Shirakawa-go village that is now a UNESCO World Heritage Site. Other areas built houses with very strong, low-pitched roofs so that people could climb up and shovel off the excess snow.

The "gassho-zukuri" farmhouses were built with steep thatched roofs

The “gassho-zukuri” farmhouses were built with steep thatched roofs

Other buildings have shallow-pitched roofs where snow could be easily cleared

Other buildings have shallow-pitched roofs where snow could be easily cleared

Visitors are able to wander around and enter the buildings. Inside are many of the everyday tools and artifacts used by their original inhabitants. Each structure also functions as a museum for one aspect of traditional mountain life, including weaving, house building and repair, cultivation, transport, etc.

The houses are packed with many original artifacts

The houses are packed with many original artifacts

This building displayed many looms and other fabric processing equipment

This building displayed many examples of looms and other fabric processing equipment

Models are also used to show house construction techniques and such things as farm layouts.

A model showing the construction of a "gassho-zukuri" house

A model showing the construction of a “gassho-zukuri” house

The immense size of many buildings is very impressive. Large extended families would have all lived together under one roof.

Many of the farmhouses are very large spaces

Many of the farmhouses are very large spaces

Most buildings also feature space for the domestic animals

Buildings also feature space for the domestic animals alongside the people

Hido no Sato even features an original village well that has been painstakingly reconstructed on the site.

A village well

A village well

A view down the well showing the handmade wooden buckets

A view down the well showing the handmade wooden buckets

A fascinating old phot showing one of the buildings before it was moved

A fascinating old photo showing one of the buildings before it was moved

Hida no Sato is a very peacefull and picturesque place to visit

Hida no Sato is a very peaceful and picturesque place to visit

Some old thatched roofs have developed into interesting little ecosystems

Some old thatched roofs have developed into interesting little ecosystems

The village has a couple of little rice paddies that were developing a nice crop when we visited

The village even has a couple of little rice paddies that were developing a nice crop when we visited

Developing rice

Developing rice

This is a wonderful place to visit and certainly proved much more interesting than we had anticipated. In one part of the site visitors can watch traditional craftspeople at work and buy their wares.

The doll is called "Sarubobo" and is a symbol of Takayama

The doll is called “Sarubobo” and is a traditional symbol of Takayama


Kaga Yuzen Dyeing

Yuzen Dyeing is a traditional process for decorating silk which uses a paste resist made from glutinous rice to contain dyes within desired boundaries. It can be thought of as a sophisticated production version of the western “Serti” technique for silk painting. While Yuzen dyeing is carried out in many parts of Japan the most famous traditional area of production was the “Kaga” region, an old province, now part of Ishikawa Prefecture on the North coast of Honshu.

Restrained, traditional Kaga Yuzen Kimono at the Kanazawa Museum for Traditional Products and Crafts

Restrained, traditional Kaga Yuzen Kimono at the Kanazawa Museum for Traditional Products and Crafts

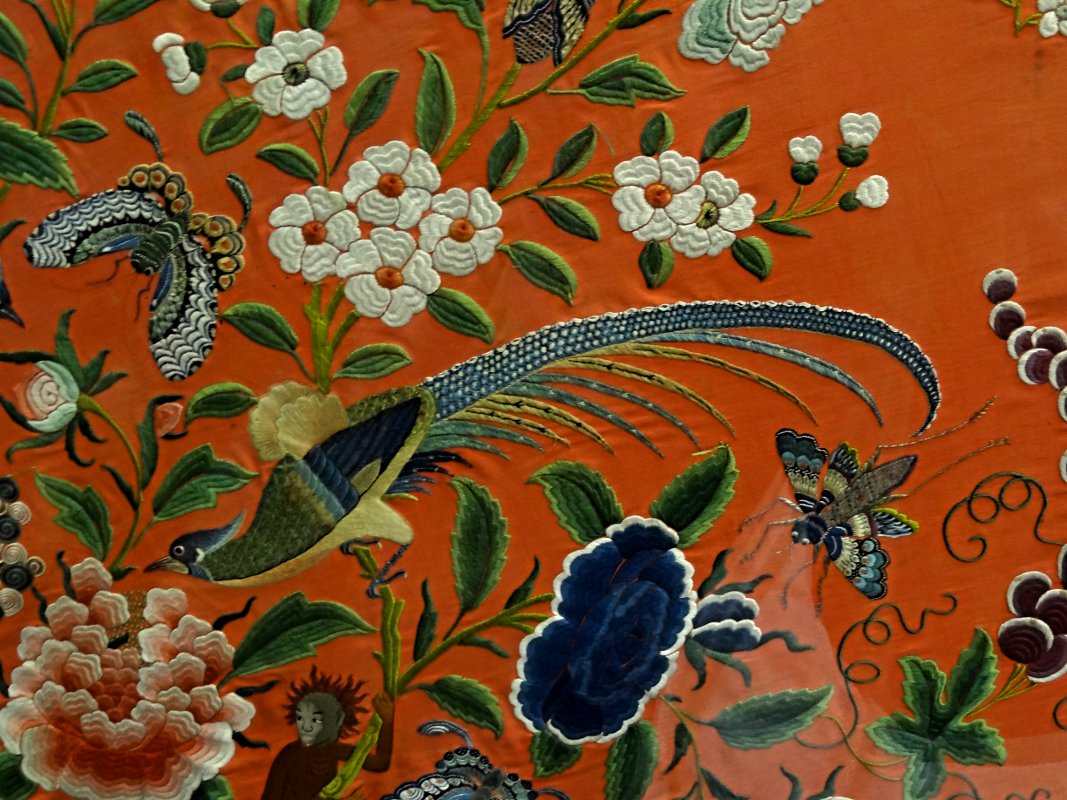
Kaga Yuzen production was centred in Kanazawa and the decorated Kimono silk from this area became famous from the eighteenth century onwards. The distinguishing features were highly naturalistic designs based on plants and animals and a colourful but strictly limited palette.

During our visit to Japan this year, Alex and I travelled to Kanazawa to see what we could learn about Kaga Yuzen dyeing as practised today. Our first port of call was the city’s Museum for Traditional Products and Crafts. This was a very interesting place to visit with some great exhibits by young craftspeople but it only had a few Kimono and very little information.

Kaga Yuzen features fine white lines between the blocks of colour and often has fine shading within the colour areas

Kaga Yuzen features fine white lines between the blocks of colour and often has fine shading within the colour areas (Click to enlarge)

Our next port of call was Kaga Yuzen Traditional Industry Centre, a sort of co-operative education and marketing effort for all the local producers. Sadly this featured the same disappointments we encountered at a few other venues in Japan: no photography permitted and a distinct feeling that they only really cared about you spending time in the gift shop buying the quite pricey and often slightly tacky souvenirs. Still, the displays did feature many Kimono including some with very dramatic and unusual compositions. We were also able to sit and watch a lengthy TV documentary on Kaga Yuzen dyeing. One thing the displays at this Centre made clear was that today’s Kaga Yuzen dyers have now largely abandoned the traditional restricted and restrained colour schemes in favour of much more exuberant, sweet and perhaps even syrupy hues.

The Kaga Yuzen Traditional Industry Centre had lots of Kimono on show but was disappointing

The Kaga Yuzen Traditional Industry Centre had lots of Kimono on show but was disappointing

The next day we went to a privately run Kaga Yuzen studio, the Nagamachi Yuzen Kan. Here we were made very much more welcome with photography positively encouraged and a helpful guide who tried hard to be informative, despite speaking little English. I suspect that this studio makes most of its income through teaching but it had a large gallery full of Kimono on display. The sweet, bright pastel colours were again in evidence but the technique shown was superb.

The Nagamachi Yuzen Kan had a large gallery space and a welcoming atmosphere

The Nagamachi Yuzen Kan had a large gallery space and a welcoming atmosphere

A design drawing.

A design drawing.

The Kaga Yuzen process can be summarised as:-

1. The design drawing is transferred to the silk over a lightbox using fugitive ink that will wash out.

2. The design is outlined in very fine lines using a bag of rice paste and a fine nozzle similar to that used in cake decoration

An artist's work table. Note the heater set into the surface to dry the dyes

An artist’s work table. Note the heater set into the surface to dry the dyes

3. The individual areas of colour are painted in. Artists use an electric heater to quickly dry the dyes so that they do not run and work on the different sections of Kimono fabric simultaneously.

Artists work on several pieces at once

Artists work on several pieces at once. Bent bamboo strips with pins in each end are used to stretch the silk

4. The fabric is given a short steaming to fix the painting before all the design areas are coated with rice paste resist.

5. The fabric is stretched and the background is rapidly coloured in using a large brush.

The black background was painted after the design was fixed and covered with resist

The black background was painted after the design was fixed and covered with resist

6. The fabric is given a final steaming to fix all the colours

7. The silk is washed to remove all the rice paste and excess dye. Formerly this was done in the local rivers but now this only happens during festivals and special events to entertain tourists.

8. After drying and ironing the finished fabric is made up into a Kimono.

A finished Kimono

A finished Kimono

Wai-Yuk Kennedy - Kaga Yuzen artist!

Wai-Yuk Kennedy – Kaga Yuzen artist!

Some New jewellery Work

Hi, I have not been posting here for a while but I hope to get back to adding regular updates soon.

Meantime here are a few of my recent textile jewellery pieces.

A cuff bracelet

A cuff bracelet

Matching textile necklace

Matching textile necklace

Another, distinctly assymetric necklace

Another, distinctly asymmetric necklace

Brooches are not the fastest sellers but are still my favourite objects

Brooches are not the fastest sellers but are still my favourite objects

And this winter I have been making a lot of earrings!

And this winter I have been making a lot of earrings!

More earrings

More earrings

Yet more earrings!

Yet more earrings!

Just a few samples of my recent earrings

I have made many more – It has been a long (wet) winter!

Manila Shawl in the V&A

This is a post about a fabulous “Spanish” or “Manila” shawl on display in the Chinese section of the V&A Museum in London.

The beautiful Spanish shawl in the V&A

The beautiful Spanish shawl in the V&A

One of the things that I love best about revisiting my favourite museums is the possibility of noticing and then focussing on an object that one has previously passed by. I know that I have walked past this shawl many times and I have even stopped to look at it, yet it was only on my last visit that the full beauty and quality of this item fully struck home.

The shawl features exquisitely embroidered flowers, insects and birds

The shawl features exquisitely embroidered flowers, insects and birds

The “Manton de Manila” has a long history in Spain. The shawls were made in South China but the name comes from the port of Manila in the Philippines. The Philippines became a Spanish colony in 1565 and was part of New Spain, administered from Mexico. This meant that Asian goods for the Spanish market were shipped on “Manila Galleons” to the west coast of Mexico, then transported overland to the port of Veracruz for shipment to Spain.

Bird detail - Possibly a pheonix?

Bird detail

The early shawls were embroidered with native Chinese motifs but the dragons, pagodas, etc., were soon replaced by colourful flowers and other images more suited to the customers taste. The other big addition the Spanish made was the long swaying fringe which provided the movement that made the shawl such a classic piece of flamenco costume.

The shading on the flower petals is meticulously executed

The shading on the flower petals is meticulously executed

This shawl is striking for the quality of the embroidery. This piece was made purely as a commercial export product, with no pretensions to being art, yet both the workmanship and the design are full of vitality. This design is also notable for the distinctly Chinese elements in the design, such as the “lion dogs”.

Unlike most shawls for the European market, this one features distinctly Chinese motifs

Unlike most shawls for the European market, this one features distinctly Chinese motifs

The shawl dates from the second half of the19th century when the “Spanish shawl” became an important fashion accessory throughout Europe and North America. In Britain they were frequently put to another use, commonly being employed as a decorative cover for grand pianos.

One of many quirky insects

One of many quirky insects

One of many finely detailed butterflies

One of many finely detailed butterflies

For some wonderful photographs of flamenco dancers and their shawls please see Ottoman Dandy’s post.

New Jewellery From Old

Usually I like to start a new project from scratch. Reworking pieces that I have previously made is always difficult and a little less satisfying than creating a whole new piece of work.

If you make things by hand for a long time, you inevitably end up with a growing collection of odds and ends lying around. These can be from experiments that did not work out, or were abandoned, or even finished works never sold and you were never completely satisfied with. Once in a while I make an effort to use some of these pieces to develop new work and I recently produced a number of things that I am quite pleased with.

The neck-piece shown below is an example where I have combined various parts to make one new work that I think works quite well.New_Neckpiece_2New_Neckpiece_1New_Neckpiece_3

I have also been producing some completely new neck-pieces and have included photographs of a couple for comparison.Neckpiece_2 Neckpiece_1

New Brooches

I thought I would share a few of the pieces I’ve been working on lately. With these brooches I have focussed on creating lines that flow and echo within the shapes.
We’ve been experimenting with different lighting when photographing, but it’s sometimes a struggle to reproduce the original colours in photos. Let me know what you think!

Pastel rainbow textile brooch by Wai-Yuk KennedyAutumn textile brooch by Wai-Yuk Kennedy???????????????????????????????

‘Empress Dowager’ Textile Sculpture

In my last post, I gave a sneak preview of a piece I made for an exhibition at the Bristol Guild GalleryThe exhibition was put together by the South West Textile Group, and was entitled, ‘Suspension.’ 

I was interested in the challenge of creating a three dimensional form, and the end result was ‘Empress Dowager’ – a 3D hanging textile sculpture. I used many of my original textile techniques to create it, but had the added challenge of making sure that the sculpture was interesting from every angle.

'Suspension', textile art sculpture by Wai-Yuk Kennedy

'Suspension.' Detail.

‘Empress Dowager.’ Detail.

The design was originally inspired by Buddhist parasols and by the ceremonial parasols that I saw in The Forbidden City, Beijing, many of which were embroidered with colourful, racing dragons. The parasols are traditionally a symbol of luck, royalty and protection, whilst dragons symbolise royalty and Imperial power.

Buddhist parasol

Buddhist parasol

A ceremonial parasol in the Forbidden City

Although the Bristol exhibition is now closed, the South West Textile Group will be showing the ‘Suspension’ exhibition at The Town Mill Gallery, in Lyme Regis, from the 3rd – 30th October 2013.

You can find more of my large-scale textile work here:
Textile Sculpture: 4D Sphere
Textile Relief: Dragon

'Suspension', textile art sculpture by Wai-Yuk Kennedy

‘Empress Dowager’