Making my base fabric

Tonight I am giving you a post about how I produce the base fabrics that I use to make my jewellery.

Before creating my jewellery pieces, I first produce the basic material to be cut out and stitched. Here are some photos of a new piece of material made recently:
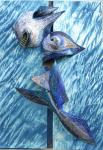
Step 1

Step 1

First a suitably coloured background material is bonded onto a layer of Vylene stiffening material.

Step 2

Step 2

Small pieces of fabric, ribbon, threads, etc are placed onto the base layer, over some bonding powder.
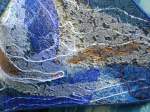
Step 3

Step 3

A complex multi-colour pattern of tiny elements is gradually built up.

Step 4

Step 4

A layer of organza is placed on top and then ironed to bond it to the layer below.
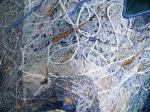
Step 5

Step 5

Freehand machine stitching over the entire sheet fixes everything together.
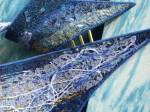
Step 6

Step 6

The fabric is lightly treated with a heat gun to expose some more of the colours beneath.
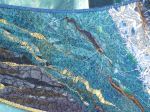
Step 7

Step 7

Another layer of small pieces and another layer of organza are added. the surface is then stitched using a variety of pattern embroidery stitches.
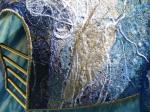
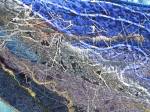
Step 8

Step 8

Stitching over the now complex layered fabric. With experience, great depth and subtlety can be achieved.
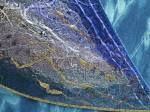
Step 9

Step 9

Final treatment with a heat gun brings out the depth of the material.

Step 10

Step 10

The completed base fabric ready to be cut up and stitched into jewellery pieces.

New Textile Jewellery Brooch

Here are some photos of a fabric brooch I have recently completed. This is another little exploration of the watch gears / “steampunk”  theme I have been playing with lately, I really like the contrast between the gleaming mechanical precision and the organic-ness of the fabric!

Textile Jewellery, Pink Fabric Jewellery with steampunk theme, recycled textile jewellery

This textile jewellery piece is now for sale on Etsy http://www.etsy.com/shop/WaiYuk

Textile Art: Dragon

A little while back I took part in the Cornwall Crafts summer show at Trelowarren. I wanted to create a much bigger textile relief than any I had previously designed, and the result was Dragon. A bigger piece meant a lot of different challenges; there were difficulties that were never an issue for smaller pieces, particularly how to keep such a large surface interesting whilst maintaining a sense of unity of form.

Designing the Template
I began by cutting smaller scale paper templates in order to explore different shapes. The relief was cut from one piece, then shaped and stitched into a three-dimensional form. I cut out a template from fabric of roughly the same stiffness and flexibility to my own fabric to confirm that the design would work.

Making the Fabric
I used the same techniques as on the smaller pieces, but much more attention was needed to make sure that the entire surface flowed together. Different parts of the dragon were shaded in bronzes and golds, and white was used as a highlight. Alex cut brass tubing into lengths, which were added to provide contrast and structure.

Framing the Dragon
I wanted the background to be an integrated part of the design, and so rather than use a plain colour fabric, I used Japanese shibori techniques with indigo dye on silk. The silk panels were mounted over canvas onto wooden frames, and then finally the dragon was hand-stitched onto the silk.

Pandamonium

And on another note entirely, I’ve also made a couple of panda-themed creations. I’ve finally been able to use the plastic animal eyes I have lying around from when I used to make soft toys for the kids (as yet I haven’t found a non-creepy use of plastic eyes in my textile art!).